
Deploy Angular Universal SPAs using Laravel Forge
When it comes to building SEO-friendly web applications, it is required for the app to be rendered on the server side, regardless of the technology.
Google crawlers only understand HTML and struggle with JavaScript.
People in love with Angular -like me- probably have landed on turning their app into an Angular Universal app in order to enable SSR capabilities.
Deploying Angular Universal (SSR) applications might be a bit tricky. There are a lot of tools around. As a Laravel enthusiast, you might be managing your Backend deployments using Laravel Forge. Forge is known for hosting PHP sites as well as static HTML sites. With few customizations deploying an Angular application using Laravel Forge is actually a breeze.
Building the App
Running Angular Universal apps locally is so simple and can be done through the registered command in package.json
npm run dev:ssr
This command will create a dist folder containing your build, which consists of a folder following your example. This folder has another two folders:
1- browser folder: which holds all of the assets (html/css/js) files required by the browser to run your app. This folder should have the index.html file.
2- server folder: which consists of the express server scripts responsible for rendering your app on the server side. This folder should include a main.js file.
Deploying the App
But wait, how can I test my app online, on a staging environment let’s say, without wasting hours of time trying to go through the complexities of (Amazon ElasticBeanStalk) or (Amazon Lambda & S3)? it’s painful, trust me.
Well, there is a bunch of options. People working with Laravel are probably familiar with Laravel Forge, which is a service responsible for managing/deploying PHP applications.
But wait, it’s meant for PHP and Static HTML sites, how can I run a node server to host an Angular Universal app? Follow the below steps:
Steps to deploy Angular Universal to Laravel Forge:
- Create a PHP site and connect it to your front-end repo on Github. Let’s assume your site name is example.com
- Once created and connected, you’ll first need to adjust the deployment script to build your Angular universal app and make it ready to be deployed. The script should look like the following:
#Pull latest code
cd /home/forge/example.com
git pull origin $FORGE_SITE_BRANCH
#Install dependencies
npm install
#Prepare SSR Build
npm run build:ssr
#Restart node daemon
pkill -f 'node dist/example/server/main.js'
- In order for the app to work, we need to run a node server against the built express server script inside the
dist/example/server/main.js. So if you run nodedist/example/server/main.jsit should create a webserver listening on port4000, Head to your browser, and as expected, the app should not work, since HTTP traffic is being directed tophp-fpmservice. - Now, we need to take care of the HTTP traffic coming to example.com to be served from the express server at
http://localhost:4000The default Nginx file created for your site needs to be adjusted to serve as a proxy, where all of the traffic coming to your site is proxied to the port opened by express. Your Nginx file should look like the following:
# FORGE CONFIG (DO NOT REMOVE!)
include forge-conf/example.com/before/*;
server {
    listen 80;
    listen [::]:80;
    server_name .example.com;
    server_tokens off;
    root /home/forge/example.com/dist/example/browser;
# FORGE SSL (DO NOT REMOVE!)
    # ssl_certificate;
    # ssl_certificate_key;
add_header X-Frame-Options "SAMEORIGIN";
    add_header X-XSS-Protection "1; mode=block";
    add_header X-Content-Type-Options "nosniff";
index index.html index.htm;
charset utf-8;
# FORGE CONFIG (DO NOT REMOVE!)
    include forge-conf/example.com/server/*;
location / {
        proxy_pass http://localhost:4000; # Port number of node http server
        proxy_http_version 1.1;
        proxy_set_header Upgrade $http_upgrade;
        proxy_set_header Connection 'upgrade';
        proxy_set_header Host $host;
        proxy_cache_bypass $http_upgrade;
    }
location = /favicon.ico { access_log off; log_not_found off; }
location = /robots.txt  { access_log off; log_not_found off; }
access_log /var/log/nginx/example.com-access.log;
error_log  /var/log/nginx/example.com-error.log error;
}
# FORGE CONFIG (DO NOT REMOVE!)
include forge-conf/example.com/after/*;
- Now, given that we have run the node server manually, it will be killed once you close the server. In order to keep the node server always running, we can utilize the power of Daemons shipped by Laravel forge. Scripts that are run as daemons are managed by a supervisor responsible for keeping the process alive. Navigate to the server (not the site) and from the left sidebar, select daemons, and create one as described by the below screenshot:
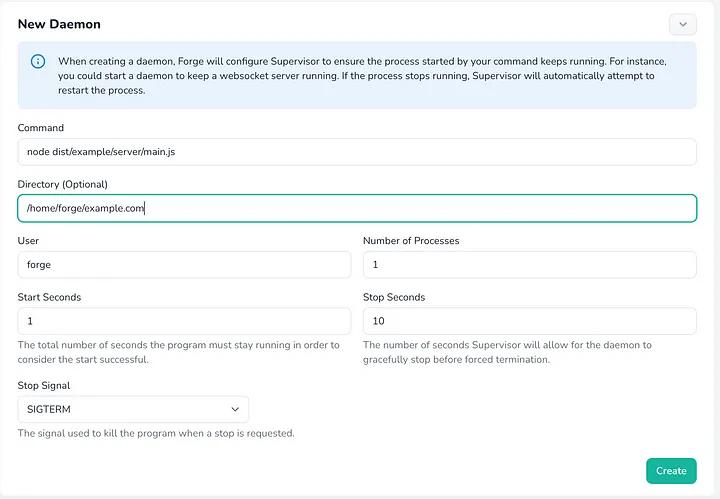
- Once created, it will make sure that there exists a process that runs the node express server at port
4000. Now, head to the browser, and your app should be Up and Running.
Going back to the deployment script, if you take a look at the last line, this should tell the server to kill the daemon process currently running, in order to serve the newly deployed changes.
#Restart node daemon
pkill -f 'node dist/example/server/main.js'
The last step is to Enable Auto Deployments, which is a great feature to help you automate your site deliveries.